Friday, March 22, 2013

Mixed-Media Art

I am fascinated with the idea of taking junk and making it into something beautiful. It's even better if it is functional and beautiful, but...not in this case -- unless you consider 'looking pretty' to be a function.

I have a tendency to pick up blocks of finished wood at rummage sales and thrift stores with the intention of adding some creativity to it later. Some were bread boards, some were plaques, you get the idea...

This particular wooden block was from my grandfather. He fancied himself a photographer and took hundreds, if not thousands of pictures during his life. He had enlarged this photograph and attached it to the board and then covered with some kind of sealer or varnish. It looked like it came right out of the 70's. This was the base for this art project. I considered removing his photograph, but decided to keep it as an added dimension to the piece. I began by gluing elements to the middle of the block and worked my way outward. For the adhesive, I used the tacky craft glue, which dried clear.

Mixed Media Art, "Bubble up" by Kelly E. Lee
Truth be told, I am captivated by glues and tapes, and the process of finding the right one for a project. If you have crafting ambitions, learning about adhesives is essential to making the project work correctly. After gluing various trinkets and treasures onto the piece, I let it dry on a flat, level surface for about three days. Probably 24 hours would be sufficient, but I put on a lot of glue, trying to emulate a cheap version of resin crafting. I was rather pleased with the results. I ended up using buttons, broken clear glass, metal rings, and a necklace chain. Of course, I added blue glitter in with the glue. What's a project without a little glitter?

Painting Flowers with Acrylic


In 2005 I was watching an HGTV show on creating your own original artwork. One project looked so easy that I thought I would try it out. I bought a couple of canvases, craft paints, and brushes from Hobby Lobby for only a few dollars - and I was off and running. What happened next was unexpected. I loved what it felt like to put paint on canvas. Just one year later, I had produced 35 abstract paintings. Although some of them weren't masterpieces, each one was a journey and a lesson to learning a new technique.


Painting by Karrie Evenson
Recently I picked up the brush again after taking a long break from painting. I felt ready to expand my skill set create a different kind of painting than I had in the past. After perusing the internet and YouTube for painting tutorials, I found one in particular that I wanted to follow. The video was from a public television station that aired a show called "Karrie-on-Canvas," and was now posted on YouTube. This episode focused on painting flowers in a vase with acrylic paints.

I liked the style of the artist, so I decided to give it a shot.

Yellow Flowers by Kelly E. Lee


On a basic level I followed her steps. I drew the basic shape of the bouquet, the vase and the table in pencil. Then began filling in the shapes, working on creating depth and shadow as I went along. I also changed the colors that were used, and just used colors that I like and enjoy. 

During this process I found many other artists that had awesome videos on painting. One in particular artist that I would recommend is Tim Gagnon and Gagnon-Studio. He is an amazing artist who generously shares his insights and techniques. Here is the link to one of my favorite YouTube videos of the artist in action. 

Wednesday, November 21, 2012

Hand-Crafted Book & Altered Book Cover

I enjoy mixed media and paper crafts, so I would like to share some of my favorite projects. Here are two: an altered book and hand-crafted book made from items I have around the house.

Altered book. This altered book was designed to be a scrapbook for my childhood pictures and memories. I have embraced using recycled materials and miscellaneous ephemera instead of store-bought scrapbooking materials (mostly). I took a large hard-cover book, appropriately I used one titled, "The Giant Book of Crafts." I painted over the cover with craft paint, and blended in some gold metallic craft paint. I added a curtain tie-back in a shimmery fabric to the front book cover, and added some fabric ribbon trim on top of the tie-back. I glued both of these with spray adhesive fabric glue. I found this old ratty Helen Keller book that was falling apart and so I used the Helen Keller cover to add embellishment to my altered book cover. I admit that I felt drawn to the Helen Keller cover, not only because it was appropriately titled, "The Story of my Life," but also because I always felt like I lived in my own little world as a kid. There is some irony there that makes me laugh. Anyway, given my status as a self-proclaimed bibliophile - using the altered book for a scrapbook just seemed right.


Hand Crafted Book. This book has plain white paper (no lines) on the inside. I used a cereal box for the front and back cover and covered them with floral scrapbook paper. I punched three holes through the covers and all the paper and tied it together with ribbons. Easy Peasy.

Monday, July 16, 2012

Elizabeth Shreve Paintings

A friend of mine - who also happens to live right down the street from me - is a wonderful talented artist. She studied at the School of the Art Institute of Chicago and where she received her Master of Fine Arts. I love the colorful aesthetic and the irony of the roles we play as women. I have chosen a few paintings in which the women are clothed in an attempt to 'keep it g.'

Fears and Desires Magnifique by Elizabeth Shreve
Elizabeth's Paintings can be viewed at the Carl Hammer Gallery in Chicago.
I and Pie by Elizabeth Shreve
Pleasure by Elizabeth Shreve

Saturday, July 14, 2012

Repurposed Ironing Boards

ironing board table.jpg
From Apartment Therapy

On a recent quest to figure out a few ideas for a wooden ironing board top I acquired a while back, I came across this photo from Apartment Therapy on a unique use for ironing boards. You could argue that these are too narrow, but for informal sidewalk seating, I think it is perfect. How great is it that they fold up and have adjustable heights?

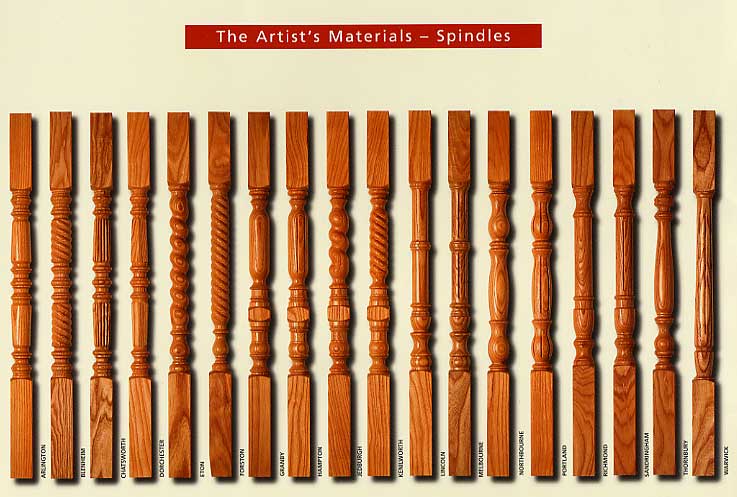
Originally, I was thinking that I might decorate the top of the ironing board with bottlecaps - as shown in my previous Junk Score Post. Since I only have the top of the ironing board, I was thinking it might be fun to add some spindles (like the ones below) as legs to create an ironing board sofa table.


Designer Collection of Spindles


Below is an example of an ironing board sofa table posted by Itsy Bits and Pieces.


From Itsy Bits & Pieces


Decorating for Kids


The best part about decorating for children is that I feel braver about adding bright colorful designs. Although I am drawn towards bright colors and cluttered aesthetics, I censor myself because it isn't quite mainstream. But with designs for children, the sky is the limit! Here are a few examples I have come across:

The rainbow tree stumps are a neat idea. Below is a daycare center room that has hanging plasticware as art. Dollar store items like these are super budget friendly. I can just imagine having a child who is crying, fidgety, or cranky and being able to entertain them with the handing objects, without having to bend over to find something off the floor. I especially like the large triangle structure for dual use with chalkboard on the outside and pseudo tent/play fort.

From KiDs Care